Series: Crafting the Ultimate Restaurant Page on TheFork - Photos

- • The Power of Restaurant Photos
- • Try TheFork Manager today
- • Top Tips for Restaurant Photos
- • Guide your guests with stunning visuals
- • Restaurant Page Content Best Practices
- • Uploading Photos: How-To
- • Showcase Your Menu Items
- • On a mission to the perfect restaurant page
- • Up next
- • Empty tables and ever-increasing costs?
If you're the proud owner of a culinary establishment that tantalizes taste buds and captures hearts, you're in the perfect place! Today, we're taking a deep dive into restaurant page photos as part of our series, ‘Crafting the Ultimate Restaurant Page on TheFork’. Pictures of a restaurant and its food are integral to how diners perceive and interact with your brand as visual signifiers of the type of establishment they can expect to find when they visit.
In this article, we’ve put some tips together to maximise the potential of your restaurant photos on online platforms like TheFork. If you don’t have a restaurant page with us yet, you can set one up here.
Links to other instalments in our series can be found below:
The Power of Restaurant Photos
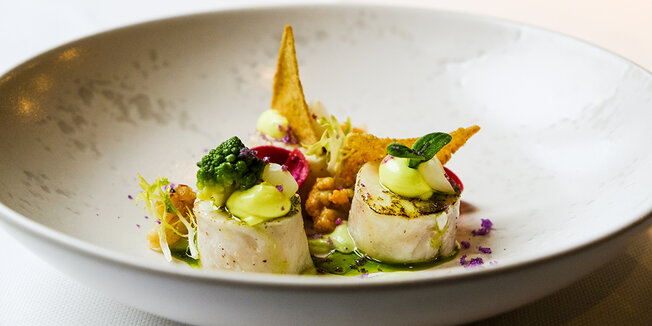
Let's face it: "You eat with your eyes" is a phrase that holds especially true in the restaurant industry. Photos are your first impression, a virtual welcoming committee to potential patrons. In a single glance, diners should understand what your restaurant is all about—the ambience, the cuisine, the vibe. For this first impression to be as positive as possible, it is crucial to include high-quality restaurant photos, as they can significantly influence user behaviour.
Did you know:
- Content with relevant images gets 94% more views than the same content without visuals (source here);
- Humans process visuals 60,000 times quicker than text (source here);
- According to Google, users form an opinion about a business within 50 milliseconds and are subsequently more attracted to simple visual effects (source here).
These statistics emphasise, in a number of ways, how important investing time and attention in producing high-quality restaurant images is for restaurants advertising online.

Try TheFork Manager today
Top Tips for Restaurant Photos
Now, we can already hear you saying, "But I'm not a professional photographer!" Fear not - you don't need to be. When taking restaurant food pictures, just keep in mind a few photography basics when aiming your camera or smartphone at what you want to publish on your restaurant page. We've covered this extensively in a separate article but have included a quick overview here:
- Use Natural Light: Use natural light to showcase your dishes and ambience at their finest. Avoid using flash that might overpower the delicious details.
- Styling Matters: Present your dishes and settings in their best light. Think about composition, colour contrasts, and details that tell your story.
- Be Yourself: Keep it real. No need to go overboard—your guests will respond well to a genuine, honest vibe.
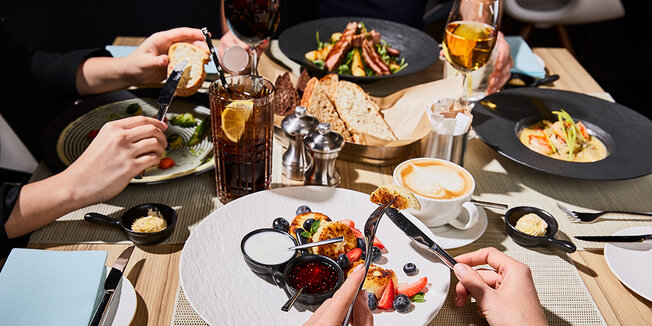
Guide your guests with stunning visuals
Imagine you're a guest checking out a restaurant's page. Those pics you're eyeing, from drool-worthy dishes to cosy corners, give you a taste of what your visit could be. It's like flipping through a photo album that guides you toward the experience you're after. That feeling you're aiming for—the one you hope to get when you stroll into the restaurant for an awesome meal—it starts right here.
Make sure the album you create on your restaurant page does that, and add a range of images — spanning from delicious dishes to intricate interior details and the welcoming exterior — you're offering a sneak peek into the unique journey they're about to embark upon. These visuals help set clear expectations, allowing your guests to picture their upcoming visit and get excited.
While doing so, pay close attention to the first photo. That’s your superhero; it's the eye-catching glimpse that draws attention in search results and should have your guests pick your venue over the neighbours. Our research has shown that you’ve got the biggest chance of getting a TheFork user to click on your restaurant from the search results page by having an interior shot or a dish picture. You can pick your number 1 photo in TheFork Manager.
Restaurant Page Content Best Practices
After analysing thousands of restaurant pages (and countless photos), here are the key considerations to keep in mind when organising your photos:
- Optimal Photo Quantity: The ideal number of photos is six. This quantity yields the highest conversion rate (7.8%).
- Photo Quality: While photo quality is important, your images don’t have to be taken by an expensive professional. In fact, restaurants with medium-quality photos attract the highest percentage of guests, resulting in a booking rate of 9.18%.
- User-Generated Photos: When it comes to your guests' photos, more is always better. Especially with 50 or more, you begin to see a significant impact on conversion.
Uploading Photos: How-To
Now that your photography skills are sharpened, it's time to get those photos onto your restaurant page on TheFork:
- Log in to your TheFork Manager account.
- Hit up the settings at the bottom left of the screen and click "Profile photos."
- You can drag & drop or upload from your device. Plus, you can easily do this on your phone's browser or the app as well.
- Here, you can also drag the images in the order you want and pick a main photo (remember? That's our superhero). Imagine you're a guest who's not sure – what would you want to see first? The trick is to find a balance. Having 20 photos of dishes right at the start, and only then showing a picture of the dining room, doesn't really flow. Most likely, nobody will even get to that interior picture.
A small heads-up: all uploaded photos undergo validation by our dedicated photo team. This ensures compliance with our guidelines for quality and content. To ensure the best representation of your restaurant, keep in mind:
- High Resolution: Ensure your images are high-quality to maintain clarity and appeal, even on larger screens. The minimum permissible resolution here is 800x450, so please keep in mind that landscape photos are optimal for your restaurant page.
- Avoid using filters or graphic elements like text or illustrations in the photos on your restaurant page.
- It’s not allowed to have people or alcohol explicitly in the foreground. They can play a small role in your pictures, though.
Showcase Your Menu Items
Don't forget to put your menu in the spotlight too. Images of your iconic dishes can genuinely pique guests' interest in tasting what you have to offer. These images will be displayed in the menu section of your restaurant page. Have a go—this easy-to-use feature can be found at Settings > A la carte menu > Add photos to items.
On a mission to the perfect restaurant page
By following these tips and tricks, you'll be well on your way to creating a beautifully curated restaurant page on TheFork—one that captures potential patrons' attention and appetites alike. Remember, great photos work like magic—they encapsulate your restaurant's essence in a single frame and invite guests to join your culinary journey. So, pick up that camera and start capturing your masterpieces!
Up next
Find all other articles in the "Crafting the Ultimate Restaurant Page on TheFork" series here:
Don't have a restaurant page on TheFork yet but eager to get started crafting one? We'll help you get published here.
Empty tables and ever-increasing costs?
- The Power of Restaurant Photos
- Try TheFork Manager today
- Top Tips for Restaurant Photos
- Guide your guests with stunning visuals
- Restaurant Page Content Best Practices
- Uploading Photos: How-To
- Showcase Your Menu Items
- On a mission to the perfect restaurant page
- Up next
- Empty tables and ever-increasing costs?
- <
- >


- <
- >


